-
WeatherKit Attribution 이슈: Guideline 5.2.5 - Legal - Intellectual Property이해를 위한 기록들 2024. 10. 5. 13:09

Attribution 넣으세요 고객님~
WeatherKit을 사용해서 앱을 똑딱 만들어서 앱스토어 리뷰를 올렸다. 개인정보를 사용하지도 않아서 쉽게 통과 될 줄 알았는데 아래와 같이 Attribution 관련 리뷰를 받았다.
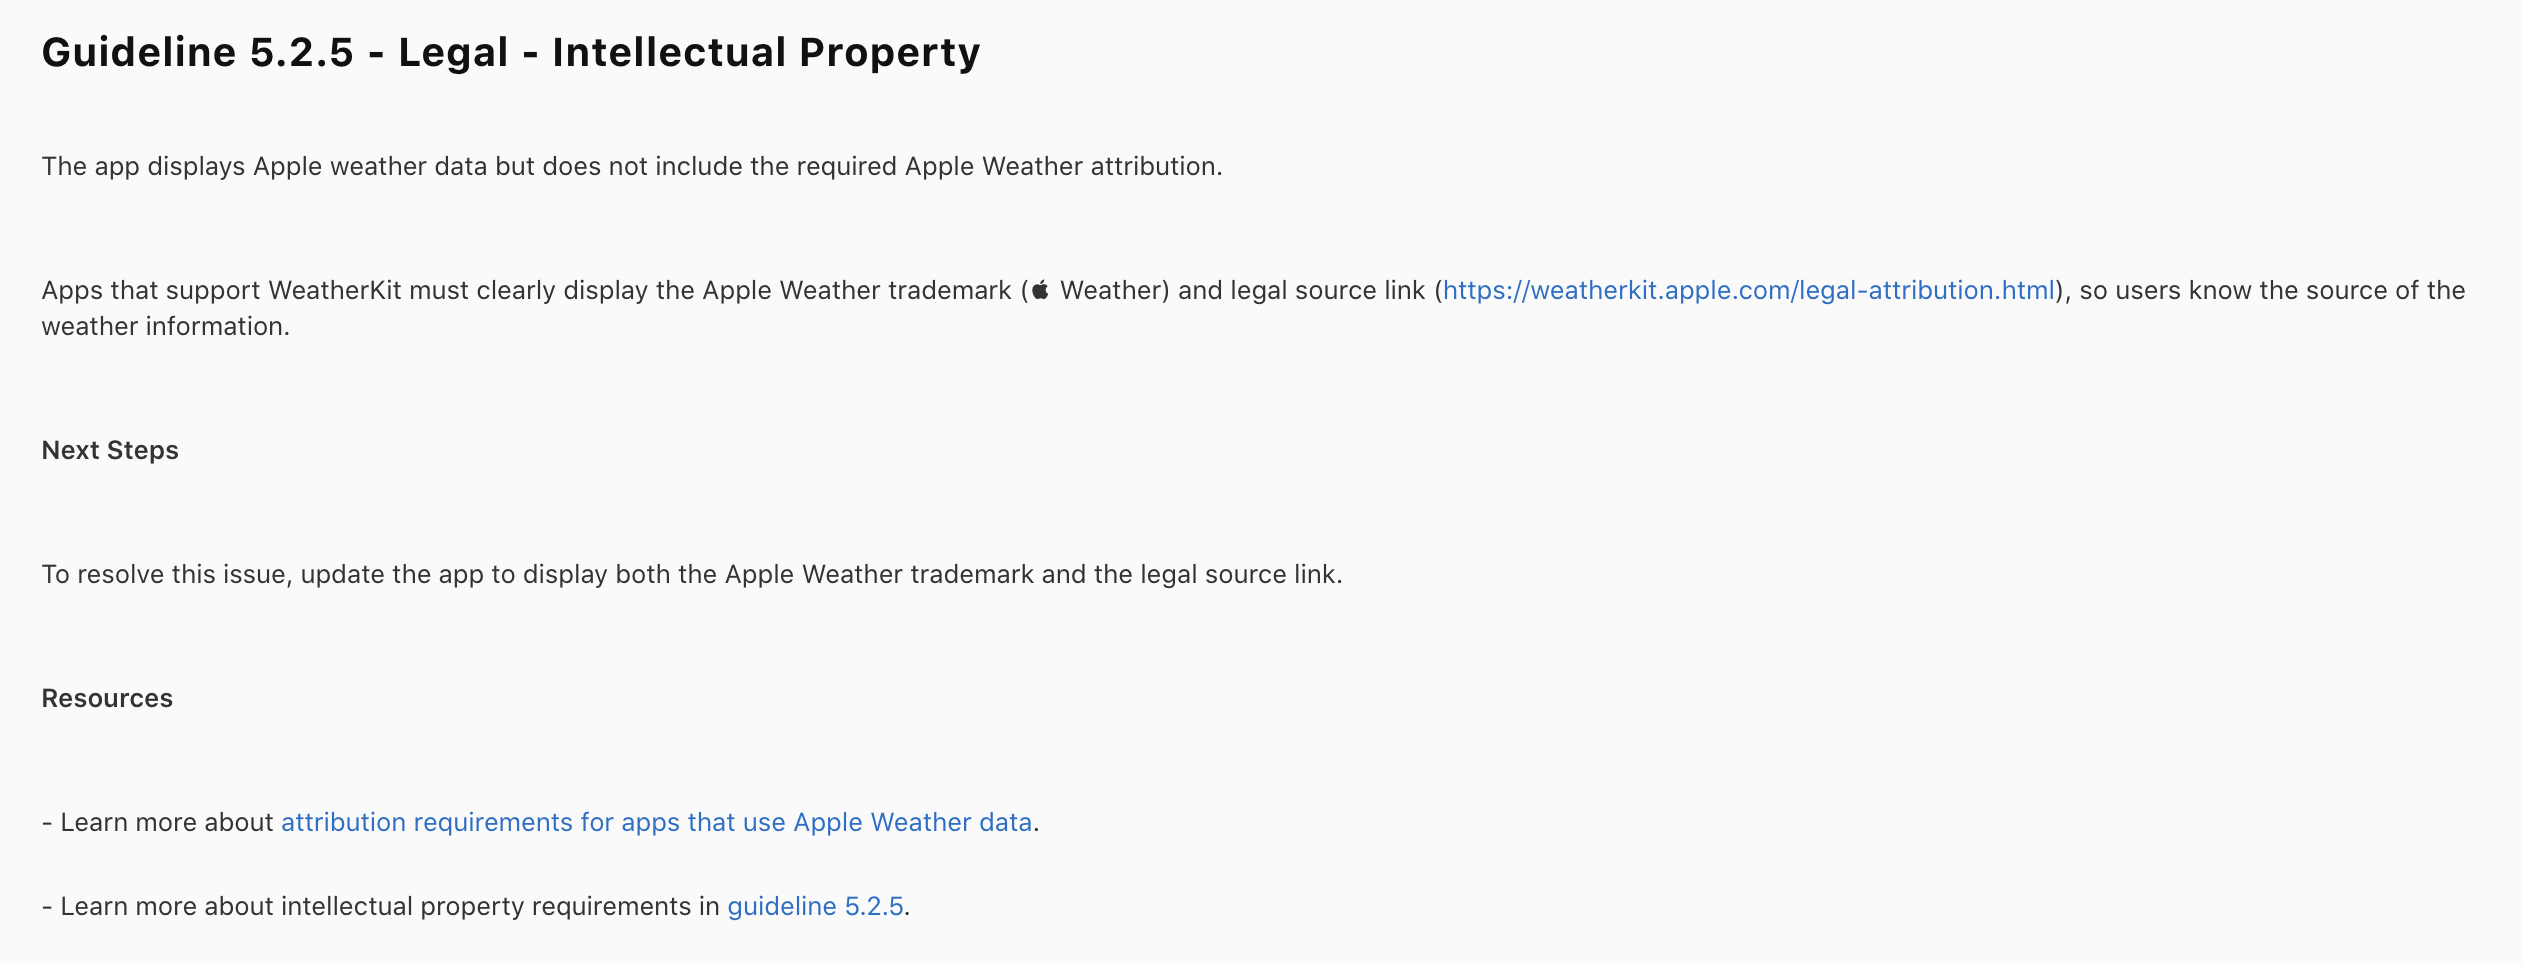
Guideline 5.2.5
알고보니 WeatherKit을 사용하게 되면 Apple Weather를 사용한다는 트레이드마크와 클릭해서 이동할 수 있는 기능을 추가해야만 심사에 통과할 수 있었다. 아래 코드를 통해 트레이드마크를 한번 넣어보자.
If your app displays Apple Weather data, it should follow the attribution requirements provided in the WeatherKit documentation.
WeatherKit 연동: 혹시나 WeatherKit을 아직 연동하지 않았다면
1. WeatherKit은 Apple Developer Program에 가입되어야 사용할 수 있다(50만건까지 무료라니!)
2. Certificates, Identifiers & Profiles(https://developer.apple.com/account/resources/identifiers/list)에서 Identifier를 추가해야 한다. 여기서 앱의 Bundel Identifier를 추가하고, Service에서 WeatherKit를 체크해야 한다.
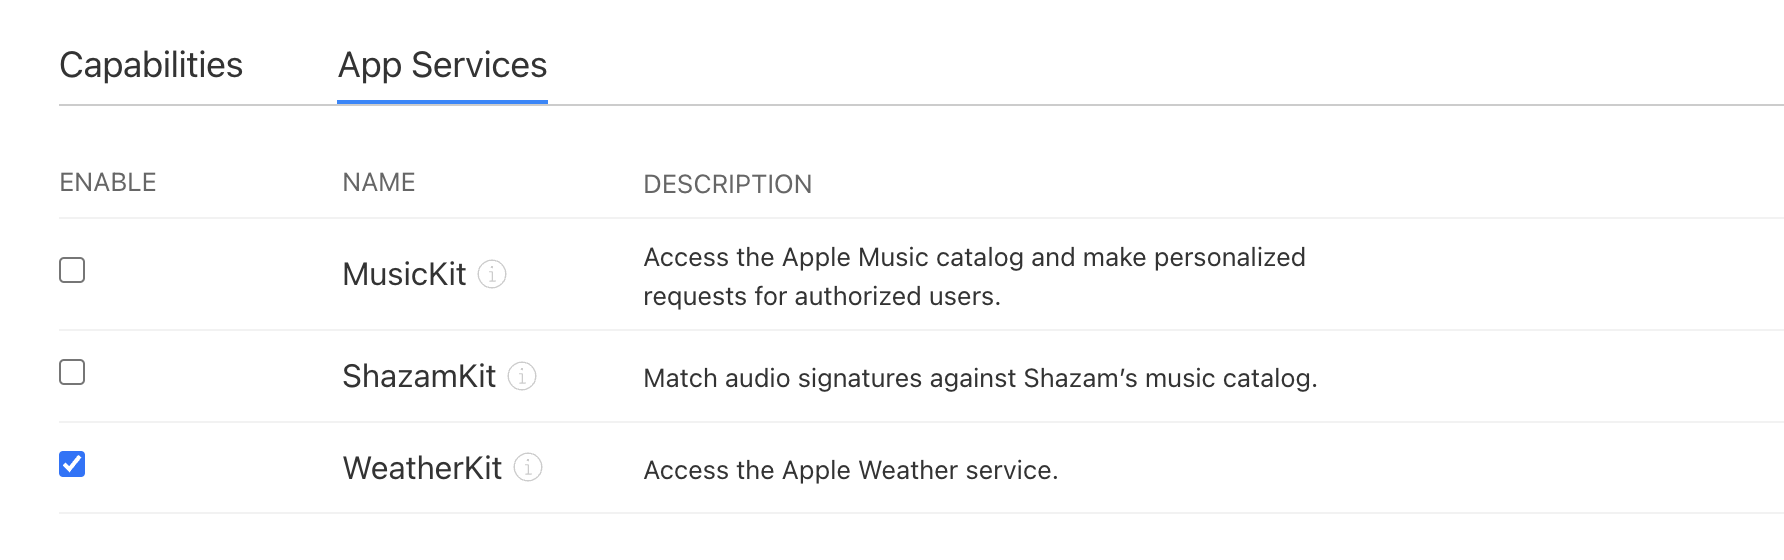
3-1. Xcode 프로젝트 정보에 들어가서, Singing & Capabilities 탭에 들어간다.
3-2. +Capability 버튼을 눌러서 WeatherKit을 추가한다.

4. 30분 정도 지나면 Certificates, Identifiers & Profiles에서 등록한 서비스가 작동된다.
5. 아래 코드를 통해 weather 정보를 정상적으로 받아온다면 연동 완료!
func get(_ location: CLLocation) async -> Weather? {
    do {
        let weather = try await Task.detached(priority: .userInitiated) { [weak self] in
            return try await WeatherService().weather(for: location)
        }.value
        return weather
    } catch {
        print(error.localizedDescription)
        return nil
    }
}
그래서 WeatherKit Attribution은 어떻게
이제 본론으로 돌아오면, attribution은 아래 코드를 통해 WeatherAttribution 객체를 받을 수 있다.
let attribution = try await WeatherService.shared.attribution위에서 받은 attribution 객체에 있는 combinedMarkDarkURL, combinedMarkLightURL, legalPageLink 을 사용하게 된다.
- combinedMarkDarkURL: URL - 다크모드일 경우 보여질 트레이드마크의 이미지 URL
- combinedMarkLightURL: URL - 라이트모드일 경우 보여질 트레이드마크의 이미지 URL
- legalPageLink: URL - 트레이드마크 클릭 시 이동해야 하는 링크 URL
1. 트레이드 마크 가져오기: colorScheme에 따라 트레이드마크 URL을 가져온다.
let attributionLogoURL = colorScheme == .light ? attribution.combinedMarkLightURL : attribution.combinedMarkDarkURL2. URL에서 이미지를 가져온다.
func loadImage(url: URL) {
    DispatchQueue.global().async { [weak self] in
        if let data = try? Data(contentsOf: url) {
            if let image = UIImage(data: data) {
                DispatchQueue.main.async {
                    self?.weatherAppleLogo = image
                }
            }
        }
    }
}
3. weatherAppleLogo를 Image로 보여주는 View를 만든다.
if let weatherAppleLogo {
    Image(uiImage: weatherAppleLogo)
}
4. 이미지를 클릭했을 때 사파리를 통해 WeatherKit 사이트(https://developer.apple.com/weatherkit/data-source-attribution/)로 이동해야 하기 때문에 Link 컴포넌트를 통해 연결해준다.
if let weatherAppleLogo,
   let attributionLink {
    Link(destination: weatherLink, label: {
        Image(uiImage: weatherAppleLogo)
    })
}
결론
App Review Guideline 5.2.5에 WeatherKit에 관한 가이드도 있지만, 애플의 기존 프로덕트와 비슷한(아이콘)을 만들지 못하게 하는 것과, Apple Music preview를 사용한다면 해당 음악으로 이동할 수 있는 링크를 넣어야 한다는 등의 가이드를 같이 확인할 수 있었다. 시간이 될 때 다른 가이드도 보면서 리뷰 포인트에 대해 알아봐야겠다.

'이해를 위한 기록들' 카테고리의 다른 글
'Instrument' 처음 시작하기: Instrument 기초와 기본 활용 (2) 2024.11.01 Code Signing & Provisioning Profile 총정리: 하나의 앱을 여러 팀원과 공유하기 (1) 2024.10.21 함수형 프로그래밍 (0) 2023.01.15 Skeleton UI 적용기 (0) 2023.01.11 프론트엔드 네이밍 규칙(with 코딩 컨벤션) (0) 2023.01.07